Preparing for the New Engine (II)
I have been working on modifying the old engine beds for the new engine. This has been a bit of a complex process because the new engine has a narrower footprint than the old engine and its feet will sit slightly lower so both vertical and horizontal modification of the bedlogs is required. The two aft feet of the new engine also partially land on the aft floor timber; this will require some careful work when positioning the engine to ensure the bolts for the feet end up on something they can actually be screwed into.
The approach I finally decided upon was to add shelves to the bottoms of the existing bedlogs. These shelves extend inward and provide support on the narrower footprint. I then added extensions to top of the shelves to get to the correct height. I was able to get some very nice 2" thick quarter-sawn white oak from Halifax Specialty Hardwoods to make these components and it worked out very well. All fasteners have been sourced from Fairwind Fasteners.
First I needed to cut down the bronze plate on the floor timber at the aft of the engine beds. This actually ended up being quite easy: I used a reciprocating saw with a blade suitable for non-ferrous metals and a bit of 3-in-1 oil for lubrication. It only took half-an-hour or so do the cutting and to clean up the edges with a file. The result of the first cut is shown below:
and afterwards with both sides cut.
As well as providing extra strength, it turns out that the bronze plate is supporting some oak filler pieces on the top of the floor timber and it is to these filler pieces that the old engine bedlogs are attached. On the starboard side (left in the above pictures) the fillers extend far enough toward the centreline to support the new bedlog extensions but on the port side (right in the above pictures) they do not. I will need to add another filler piece there.
I then added the shelves to the bottom of the existing bedlogs.
They are thru-bolted to the bedlogs using 3/8" silicone bronze fin-head bolts and tied to the floor timber in the middle using 3/8" silicone bronze lag bolts. I needed to add a filler piece between the bottom of the shelves and the top of the floor timber as shown below.
Once I had shelves fitted in I added a filler piece to the port side of the aft floor timber and bolted it to the bronze plate.
Currently there are only two thru-bolts, both at the bottom of the filler piece; I will add another bolt at the top but that will wait until a later phase because I will use it to help attach yet another component.
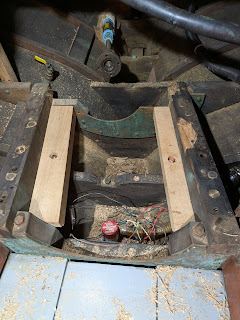
I then added the extensions on top of the shelves. As well as adding the necessary height, they also serve to tie the new structure directly to the aft floor timber.


Comments
Post a Comment